Thursday, February 28, 2013

Baby Spring Flowers Hat

Spring is one of my favorite times of year, my Mom and Dad own a flower shop and behind it is a greenhouse where you will find me in the spring planting all kinds of things from hanging baskets to herb gardens.  I love doing that although some days it is hot and tiring.  Since next week starts our next growing season I decided to make a hat that would remind me that although the ground is still white with snow outside, spring is coming!!

For this project I used a J/6mm hook and the following yarns:
Vanna's Choice Baby Lamb or Vanna's Choice White
Vanna's Choice Kelly
For the flowers I used Caron Simply Soft Lemon, Watermelon, Mango, Strawberry, Blue Mint, Limelight, and Grape which are colors that were in my stash.

Start with a magic loop or a chain 4 loop which ever you prefer working in Lamb or White.
Round 1:  Ch 1 and make 10 HDC, join to the top of the first HDC.
Round 2:  Ch 1 and do 2 HDC in each st around, join to the top of the first HDC.  (20 HDC)
Round 3:  Ch 1 and do *2 HDC in the first st and 1 HDC in the next st, repeat around, join to the top of the first HDC.  (30 HDC)
Round 4:  Ch 1 and do *2 HDC in the first st and 1 HDC in the next 4 stitches, repeat around, join to the top of the first HDC.  (36 HDC)
Round 5:  Ch 1 and do *2 HDC in the first st and 1 HDC in the next 5 stitches, repeat around, join to the top of the first HDC, join to the top of the first HDC.  (42 HDC)
Round 6:  Ch 1 and do *2 HDC in the first st and 1 HDC in the next 6 stitches, repeat around, join to the top of the first HDC.  (48 HDC)
Round 7 is worked in cluster stitches.  Ch 2 and make beg cl in the first st, (see below for instructions on cluster stitches) *ch 1, sk the next stitch and begin cl in the next st. Repeat from * around, join to the top of the first cl.  (24 CL)

The beginning cluster (beg cl) stitch is made by ch 2, yo, insert hook in the designated st, yo, pull loop through, yo, pull through 2 loops on hook, yo, insert hook in same st, yo, pull loop through, yo, pull through 2 loops on hook, yo, pull through all 3 loops on hook.

Cluster Stitches (cl) are Yo, insert hook in designated st, yo, pull lp through, yo, pull through 2 loops on hook, [yo, insert hook in same st, yo, pull loop through, yo, pull through 2 loops on hook]twice, yo, pull through all 4 loops on hook.

Rounds 8-12:  sl st to the first ch 1 space and make beg cl, *ch 1 make next cl in the next ch 1 space, repeat around, ch 1 join at the top of the first cl. (24 cl)

Rounds 13-15:  Ch 1 and SC in each st around, join at the top of the first SC with a sl st. (48 sc)

Change to Kelly green.
Round 16-18:  Ch 1, *1 SC in the next 3 stitches, post DC st above the next stitch (in row 14 on round 16), repeat around, sl st in the top of the first SC.  (12 post stitch ribs).

Make 6 flowers to sew above every other post ridge.

Flower Pattern:
Using a G/4 mm hook.
Round 1:  Make a magic loop, chain 2 and put 15 DC in the loop using Lemon sl st in the top of the first DC.  Tie off and leave enough string to sew the flower to the hat.
Round 2:  Join a contrasting color with a chain, *ch 3 sk the next st and slip stitch into the 2nd st from the chain, repeat around for a total of 8 chain loops.
Round 3:  Working on the first chain loop do *1 SC, 3 DC, 1 SC repeat around in each loop and sl st to the first SC.  Tie off and weave in the end.


This hat was made with Universal Yarn Inc. cotton supreme batik in Watermelon Patch.
The flower was made with an I size hook to make it bigger and just added a button.  I did not do post ribbing on this hat, just did single crochet for 4 rounds, 1 in each stitch.

Wednesday, February 27, 2013

Lily of the Valley Baby Throw - Knit

Blush Heather Wool-Ease by Lion Brand
 So, I have been enjoying some rest and relaxation with the family and haven't had a chance to keep up with all the new patterns mom has turned out (she is a crocheting genius in my opinion). I made this afghan pattern for a lily of the valley stitch a few months ago and hadn't taken the time to write it out, but since we are undertaking this new adventure of sharing our ideas, here it  is:

Materials: 5 skeins of Lion Brand Wool-Ease (I used blush heather). Size 7 circular needles with 36" cable.

 Cast on 136 stitches. Knit 1 1/2 inches in garter stitch (knit front and reverse).
Begin Pattern: Maintain a 5 stitch band of garter stitch as the border. Knit chart 7 times for each row.
Row 1:knit 5, *knit 4, purl 2 together, knit 2, yarn over, knit 5, yarn over, knit 2, purl 2 together, knit 1* - repeat from * to * 6 times more, knit 5.
Row 2 (and all even rows): knit 5, purl to last five stitches, knit 5
Row 3: knit 5, *knit 3, purl 2 together, knit 2, yarn over, knit 1, yarn over, knit 2, purl 2 together, knit 6* - repeat from * to * 6 times more, knit 5
Row 5: knit 5, *knit 2, purl 2 together, knit 2, yarn over, knit 3, yarn over, knit 2, purl 2 together, knit 5* - repeat from * to * 6 times more, knit 5
Row 7: knit 5, *knit 1, purl 2 together, knit 2, yarn over, knit 5, yarn over, knit 2, purl 2 together, knit 4* - repeat from * to * 6 times more, knit 5
Row 9: knit 5, *knit 6, purl 2 together, knit 2, yarn over, knit 1, yarn over, knit 2, purl 2 together, knit 3* - repeat from * to * 6 times more, knit 5
Row 11: knit 5, * knit 5, purl 2 together, knit 2, yarn over, knit 3, yarn over, knit 2, purl 2 together, knit 2* - repeat from * to * 6 times more, knit 5

Repeat chart until afghan has reached the desired length (approximately 34 1/2 inches). Beginning with reverse side, knit 1 1/2 inches in garter stitch. Bind off.


Friday, February 22, 2013

Newborn Peep Hat

One thing my Grandma Grace loved to do was knit and crochet, and when evening came you could find her in a rocker knitting baby hats that she donated to our local hospital.  This hat is similar to the ones she made. I hope you enjoy making this hat up as much as I did.

*please note that your chain 2 at the end of each round does not count as a stitch.

I used an I hook (5.5mm).
Vanna's Choice #157 Duckie
Caron Simply Soft #9605 Mango
Brown buttons 7/16" (11 MM)

Abbreviations:
ch - chain
sl st - slip stitch
SC - single crochet
DC - double crochet
HDC - half double crochet
TC - triple crochet

To start either use a magic loop or ch 4 and make a loop and ch 2.
Round 1: make 10 DC in the loop, join with a sl st to the top of your first DC and chain 2.
Round 2: 2 DC in each stitch around, join with a sl st to the top of your first DC, chain 2 (20 DC)
Round 3: 2 DC in the first stitch, DC in the next stitch, repeat around, join with a sl st to the top of your first DC, chain 2 (30 DC)
Round 4: 2 DC in the first stitch, 1 DC in the next 4 stitches, repeat around, join with a sl st to the top of your first DC, chain 2 (36 DC)
Round 5: 2 DC in the first stitch, 1 DC in the next 5 stitches, repeat around, join with a sl st to the top of your first DC, chain 2 (42 DC)
Rounds 6-9: 1 DC in each stitch around, join with a sl st to the top of your first DC, chain 2.
After round 9 chain 1.

Rounds 10-11 are worked in a post stitch ribbing, in this project the ribbing is only on the outside.  Begin with 1 SC in the first stitch and then do a post DC around the front of the next stitch, repeat around, join with a slip stitch to the top of the first SC, chain 1 and repeat instructions for round 11, tie off and weave in the end.

Feather tuft: chain 10 and make a loop by joining with a slip stitch in the first chain, chain 10 again and join in the first chain again with a slip stitch, chain 10 and join with a slip stitch in the first chain, tie off leaving enough string to tie the tuft to the top of the hat.

Beak: Start by making a square and the beak will be made around the 4 outside corners, first chain 6.
Row 1:  Starting in the second chain from your hook do 1 HDC in each of the next 4 chain stitches. Chain 1 and turn.
Row 2:  1 HDC in the next 4 stitches, chain 1 and turn.
Row 3:  1 HDC in the next 4 stitches and you have your square.

To make the beak you will be working counterclockwise in the 4 corners of the square, in the closest corner do 3 DC, chain 1, 1 TC, chain 1, 3 DC and join with a slip stitch to the next corner of the square, move on to the next corner and repeat 3DC, chain 1, 1 TC, chain 1, 3 DC and slip stitch into the top of your first DC.  To sew the beak on fold the hat in half and sew the beak in place.  I placed mine at the top of row 6 and sewed the eyes in the middle of row 5.


**Please feel free to use this pattern, you may make and sell products from it if you would like, but I ask if you do that you would please link back to my post.  Please do not copy and post this pattern and claim it as your own or republish my photos as yours.  Thank-you and enjoy!


Thursday, February 21, 2013

Snickerdoodles

This week we had some very precious visitors, our Granddaughters Abby and Olivia who stopped in for a few days on their way to Chicago and a long anticipated trip to the American Girl Place.  Being a Grandmother is one of my favorite things and when the kids are here we try to make as many memories as we can.  One of our favorite things to do is make cookies, and one of the first things the girls asked when they got here is if we could make Snickerdoodles which are a family favorite.  I too remember making cookies with my Grandma when she would come to visit, her specialty was Sugar Cookies and I will post her prize winning recipe in a future post.  This recipe is adapted from one in an old Better Homes and Gardens Homemade Cookies Cook Book.  First thing you need to do is make sure you push a chair up to the counter so your helpers can help with the ingredients, I use my KitchenAid mixer which makes mixing the dough a very simple task. Here is the recipe:

Snickerdoodles

1 cup butter softened
2 cups sugar
2 eggs
1/4 cup milk
1 teaspoon vanilla
3 3/4 cups flour
1/2 teaspoon baking soda
1/2 teaspoon cream of tartar
1/2 teaspoon salt

Abby's job is to turn on the mixer at low speed for a few minutes until everything is mixed up real good, then comes the fun part, rolling the dough into one inch balls.  Next you mix the following in a small bowl,
1/2 sugar
2 teaspoons cinnamon
Roll the balls in this mixture and flatten slightly on a greased cookie pan.  Bake at 350 degrees for 10 to 12 minutes.  I hope you enjoy this recipe and use it to make some memories!

Wednesday, February 20, 2013

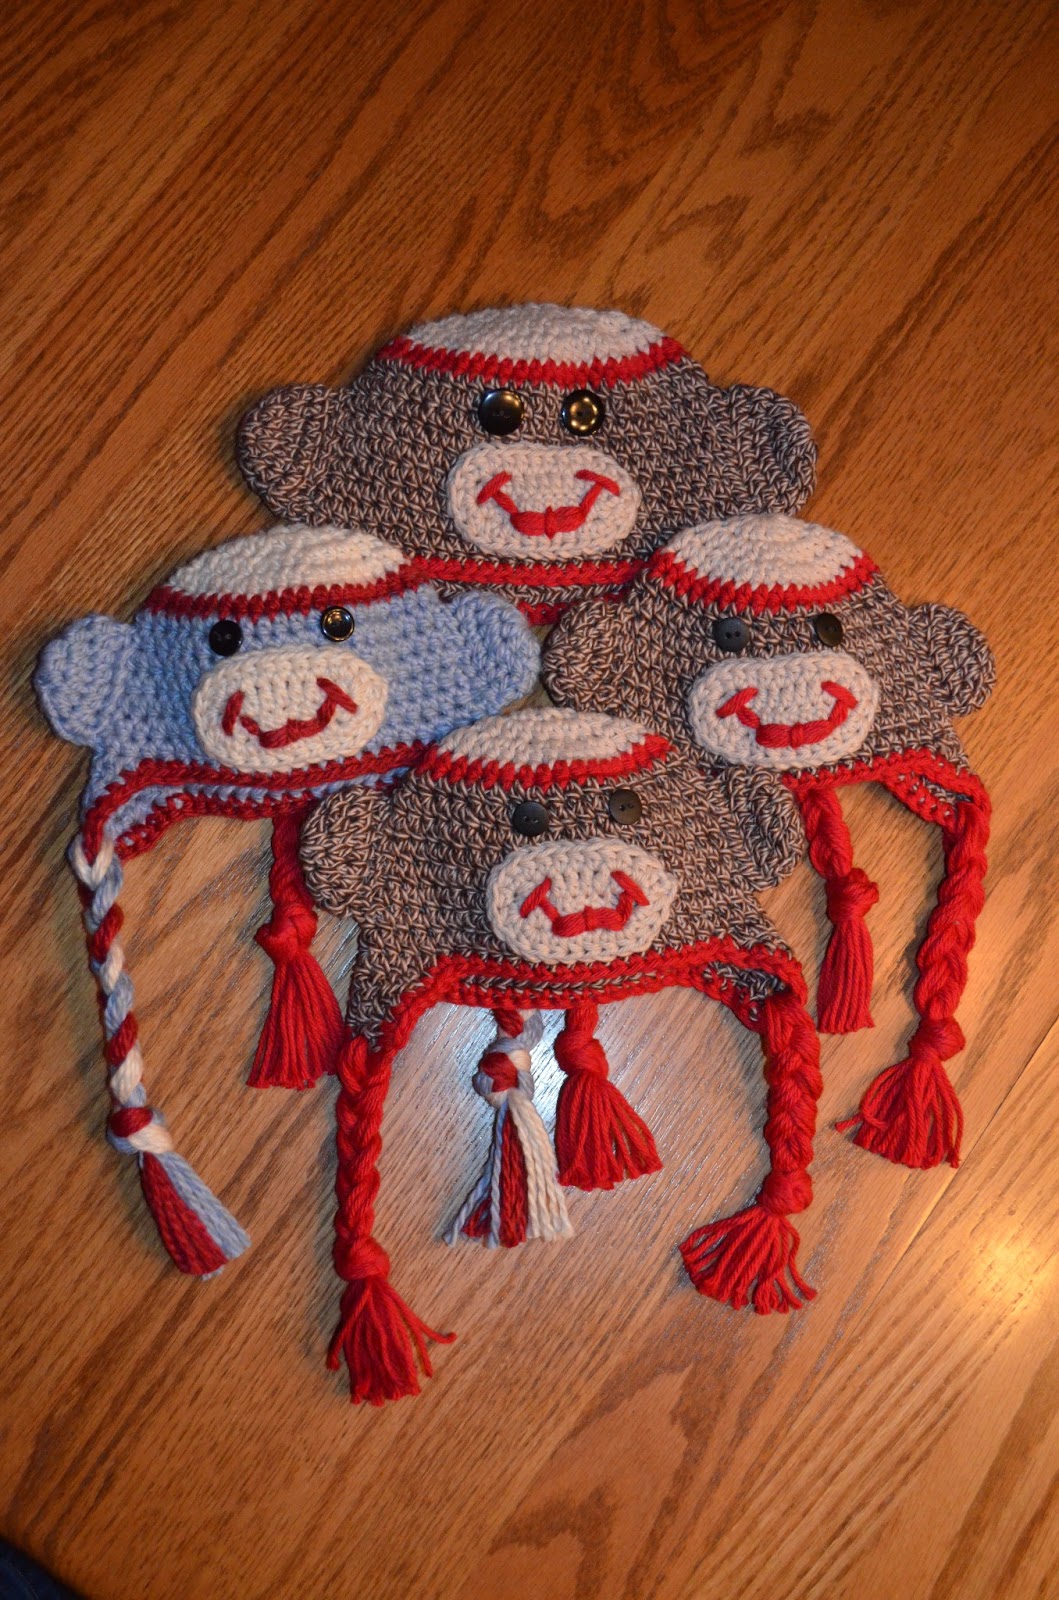
Sock Monkey Hat

Baby Sock Monkey

This pattern uses an I 9/5.50 mm crochet hook and I Love This Cotton Yarn from Hobby Lobby.
Colors used are:
#400 Monkey Brown 
#60 Red
#95 Antique Cream
Black button eyes 5/8 inch or desired size.

Start with a magic loop or make a chain 4 loop using the antique cream yarn.  
Round one: chain 2 and make 12 DC in the magic loop or chain loop, slip stitch in the top of the first stitch and chain 1.
Round two:  2 HDC in each stitch around for a total of 24 HDC, slip stitch in the top of first stitch and chain 1. 
Round three: 2 HDC in the first stitch 1 HDC in the second stitch repeat around, slip stitch in the top of the first stitch for a total of 36 HDC and chain 1.
Round four: 2 HDC in the first stitch 1 HDC in the next two stitches repeat around, slip stitch in the top of the first stitch.  Tie off the antique cream color and work in the tail.
Change yarn to the red color and chain 1.
Round five: 1 HDC in each stitch around and slip stitch to the top of first stitch.  Tie off the red and work in the tail.
Change yarn to the brown color and chain 1.
Rounds 6-14 are all worked the same, 1 hdc in each stitch around, slip stitch to the top of the first stitch and chain 1. 

To make the first ear flap chain one,
Row 1:  1 HDC in the next 8 stitches, chain 1 and turn.
Row 2:  skip the first stitch 1 HDC in the next 6 stitches, chain 1 and turn.
Row 3:  skip the first stitch 1 HDC in the next 4 stitches, chain 1 and turn.
Row 4:  skip the first stitch 1 HDC in the next 2 stitches, tie off and weave in the tail.  

To place the second ear flap fold the hat in half with slightly more stitches of the ear flap in the back than the front.  Chain 1 and repeat the instructions for rows on the first flap.  

Round 15 of the hat is worked in SC starting at the tip of one of the ear flaps attach red yarn and chain 1 then evenly spacing the stitches around 1 SC per stitch or row end, join with a slip stitch at the end, tie off and weave in your end.
   
Ears

Either start with a magic loop or a chain 4 loop, chain 1. 
Round 1:  8 HDC and slip stitch to the top of the first stitch, chain 1.
Round 2:  2 HDC in each stitch around for a total of 16 HDC slip stitch to the top of the first stitch, chain 1.
Round 3:  1 HDC in each stitch around join at the top of the first stitch and tie off leaving a long tail to sew on the ear.  
To sew the ear on I fold the hat in half and line them up with a row to make them even on each side.
Fold your ear flat and sew down both sides to attach it to the hat.

Mouth

Chain 8, noting that you will be working down both sides of the chain.  Beginning in the second loop from your hook make 2 HDC then 1 HDC in the next 5 stitches and 2 HDC in the last stitch on the top side, turn and work around the bottom of the chain with 2 HDC in the first stitch, 1 HDC in the next 5 stitches and 2 HDC in the last stitch, slip stitch to the top of the first stitch and chain 1.
Round 2:  2 HDC in the next 2 stitches then 1 HDC in the next 5 stitches, 2 HDC in the next 4 stitches, 1 HDC in the next 5 stitches and ending with 2 HDC in the next two stitches, slip stitch in the top of the first stitch and tie off leaving a long tail to sew on the mouth.  

To make the smile I use a yarn needle with a double thread.  Using the holes around between the rows keeps your smile even, start on either side and make the mouth corner, side, and three loops for the mouth to make it fuller, put a little stitch in the middle to make lips.

For Braids cut 12 strands of yarn 30 inches long for each braid using either all three colors or solid red.  Pull through at the bottom of the ear flap with your hook and braid making a knot at the bottom and cut off even.  


  You may make and sell products from my patterns, but if you do I ask that you please link back to my original post.  Please do not copy and post this pattern and claim it as your own.  Please do not republish photos as your own.  Thanks!!  


A Monster Hat - Knit


Child Sized


Materials:


Size 15 circular needle or double points and spare needle for casting off

Crochet hook (size H)

Super bulky yarn - 1 skein in green shade (Sensations Sumptuous Green shown)

Super bulky in cream and blue (or eye color)


Pattern:

Cast on 40. Join and knit in round as follows

2x2 rib for 5 rows

Stockinette Stitch until piece measures 7" (8" for adult)

Divide stitches evenly on circular needles and cast off using the double needle cast off method (or you can cast off and sew seam).


For Eye:

With eye color (blue) chain 5 and join. DC into circle around (about 12 stitches). Repeat for row 2 alternating between 1 DC into each stitch and 2 DC into each stitch (about 18 stitches). Break wool and tie off. With cream TC into back loop of each DC - every other stitch 2 TC into back loop. Break wool and tie off. Sew onto front center of hat.

A Coconut Bra - Crochet


So... I have this Hawaiian themed Awana night coming up, and I had nothing Hawaiian to my name. Since you can't knit a Hawaiian shirt, I figured a coconut bra was the next best thing. Here's my creation:


Shells (Make 2)


Size F Hook, Lion Brand Vanna's Choice Barley yarn


Round 1: Ch 4, make ring.


Round 2: Ch 2, SC 11, join.


Round 3: Ch 2, HDC 5 times, 2HDC into next stitch, HDC 5 times, HDC into first stitch, join.


Round 4: Ch 2, (HDC 3 times, 2HDC into next stitch), Repeat 2 times, HDC 3 times, HDC into first stitch and join.


Round 5: Ch 2, (HDC 3 times, 2HDC into next stitch) repeat around and join.


Rounds 6 & 7: Ch 3, (2DC in next stitch, DC) repeat around and join.


Round 8: Ch 3, (DC 2 times, 2DC in next stitch) repeat around and join.


Round 9: Ch 3, DC in each stitch and join at end. Bind off.


Straps can be added at outside corners and top center of shells. A strap can be used to join shells, or for more coverage a flower (or two as shown) can be used.


Flower pattern:


Round 1: Ch 3, DC into first stitch 2 times. Ch2. (3DC into first stitch, Ch 2) repeat until 5 or 6 clusters are created. Join.


Round 2: Into each space created by the Ch 2 in first round (SC, 2 DC, TC, 2 DC, SC). Join.